Does your family love refrigerator pickles too? Use this easy garlic dill pickle canning recipe to make homemade dill pickles everyone will love.

If your family is anything like mine, your fridge is full of jars of pickles. And while we all love to snack on fresh cucumbers, everyone also loves whole pickles as a side at lunch or when the munchies strike.
And if your garden is full of cucumbers, you'll love this quick and easy garlic dill pickle canning recipe. It's also a good way to preserve big baskets of cucumbers - the kind you grab at the farmers market or the local grocery store.
Garlic Dill Pickle Canning Recipe for Beginners

This is a good garlic dill pickle recipe if you are new to the canning and preserving process. It's a great way to get started.
You might want to grab a copy of The Ball Book of Canning if it is your first time canning pickles. I have several books on canning and preserving. This one is my favorite.
Ingredients Needed

For each quart jar of pickles, you will need the following:
- Pickling cucumbers
- 1 cup white vinegar
- ½ cup red wine vinegar
- 1 ½ cups water
- 1 tablespoon kosher salt or canning salt
- 1 Tablespoon dried dill weed or 3 heads fresh dill seed or fresh dill heads
- 1-2 Tablespoons crushed garlic or finely diced fresh garlic
- ½ teaspoon red pepper flakes
Supplies Needed for Home Canning
Do you have these canning supplies at home? If you're just getting started canning, take a look online. One of my favorite sites to browse for homesteading kitchen supplies is Lehmans.
And recently I've been enjoying looking through the items on Pleasant Hill Grain.
This is what you'll need to get started.
- Quart mason jars
- Canning lids
- Canning rings
- Jar lifter
- Large pot for water bath canning
- Knife
Directions


First, clean and sterilize the jars, rings, and lids.
Immerse them in hot water for 5 minutes.
Removing them carefully with a jar lifter.
Tip: It is much easier to run them through the dishwasher (if you have one) on the heated dry cycle and remove them, touching them as little as possible.
While your quart jars are boiling, cut off the blossom end of each cucumber to prevent softening of pickles from the enzyme the blossom can produce. This is important for crunchy pickles. After all, no one likes soggy pickles.
Next, quarter them.
Then add garlic, dill, salt, and red pepper flakes to the bottom of the jar.
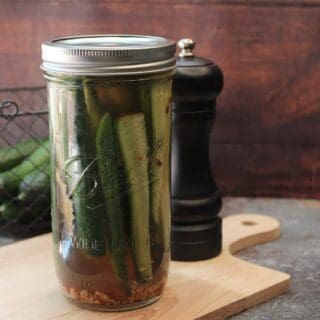
Fill the jar full but not so tight that it is a struggle to remove with cucumber spears.
Combine vinegar - red and white, or you can use one or the other if you prefer. This is just the combination I like, and water.
Note: you could also use apple cider vinegar when making homemade garlic dill pickles. It will give you a different flavor.
Pour the liquid over the pickles and spices, leaving ½" headspace for canning.
Wipe rims of jars.
Wipe off the lids of the canning jars with a clean towel, place the lid, and ring back on.
If you are making a small refrigerator batch of pickles, you can stop here and store them in the refrigerator.
Give them a couple of days to absorb the flavors before you start eating them. The longer they sit, the tastier they are!
They should last in the refrigerator for up to 3 to 4 weeks.
Canning Homemade Garlic Dill Pickles

Here's what to do if you want to can your homemade pickles.
Fill a large saucepan or pot with water and immerse your jars; ensure the water covers them by at least 1". Remove and set jars to the side.
Bring water to a full boil and place jars back in the water.
Boil for 15 minutes, remove jars and leave undisturbed for 12-24 hours.
Check the seal. If correctly sealed, the center of the lid will not move at all. Don't worry if some of your jars did not seal properly. You can still store these pickles in the refrigerator for up to a month or so.
Substitutions
Quick pickles, especially garlic dills, lend themselves easily to substitutions and additions to change the taste slightly.
My dad always seemed to like refrigerator dill pickles with black peppercorns. I've seen old pickle recipes that call for adding homemade pickling spices, full-peeled garlic cloves, mustard seed, hot peppers, coriander seeds, and even a bay leaf.
Experiment, and ask your family what they like. Not everyone enjoys spicy pickles.
Recipe
Homemade Garlic Dill Pickle Canning Recipe
Ingredients
- Pickling cucumbers
- 1 cup white vinegar
- ½ cup red wine vinegar
- 1 ½ cups water
- 1 tablespoon kosher salt
- 1 Tablespoon dried dill weed or 3 heads fresh dill
- 1-2 Tablespoons crushed garlic
- ½ teaspoon red pepper flakes
Instructions
- First, clean and sterilize the jars, rings, and lids.
- Immerse them in hot water for 5 minutes.
- Removing them carefully with a jar lifter. Tip: It is much easier to run them through the dishwasher (if you have one) on the heated dry cycle and remove them, touching them as little as possible.
- While your quart jars are boiling, cut off the blossom end of each cucumber to prevent softening of pickles from the enzyme the blossom can produce. This is important for crunchy pickles. After all, no one likes soggy pickles.
- Next, quarter them.
- Then add garlic, dill, salt, and red pepper flakes to the bottom of the jar.
- Fill the jar full but not so tight that it is a struggle to remove with cucumber spears.
- Combine vinegar - red and white, or you can use one or the other if you prefer. This is just the combination I like, and water.
- Pour the liquid over the pickles and spices, leaving ½" headspace for canning.
- Wipe rims of jars.
- Wipe off the lids of the canning jars with a clean towel, place the lid, and ring back on.
- If you are making a small refrigerator batch of pickles, you can stop here and store them in the refrigerator.
- Give them a couple of days to absorb the flavors before you start eating them. The longer they sit, the tastier they are!
- If you want to can your homemade pickles, fill a large pot with water and immerse your jars, be sure that the water covers them by at least 1".
- Remove and set jars to the side.
- Bring water to a boil and place jars back in water.
- Boil for 15 minutes, remove jars and leave undisturbed for 12-24 hours.
- Check the seal. If properly sealed, the center will not move at all. If some of your jars did not seal properly, you can still enjoy them in the refrigerator for up to a month.
Nutrition
Like this post? Save it, share it, and read it!

It was the first time I tried garlic dill pickles, super super delicious!
Thank you for all the tips. Going ahead to make some.
We put pickles on everything and grow our own cucumbers so this pickle post is perfect. (perfect pickle post - hehehe)
I love that there is plenty of dill in the pickles as that is my favourite part. I reduced the red pepper flakes as my kids really don't handle any heat. So I just added a pinch.
Really easy to follow