Are you looking for a frugal and fun way to decorate your home for fall? This easy tin can pumpkin craft is a great way to upcycle everyday household items while adding a cozy, autumnal touch to your decor. Whether you're new to crafting or an experienced DIYer, this simple project is an affordable way to create charming fall decorations.

Upcycle Tin Cans for Fall Decor
As I learned when we had to start hauling all of our garbage out from our off grid home in the Canadian far north, upcycling is an excellent way to reduce waste and create unique, budget-friendly home decor. And one common household item that's easy to reuse is the tin can. With just a little bit of paint and creativity, you can transform an empty can into a cute pumpkin decoration perfect for fall.
Using items you already have around the house, like tin cans from pumpkin puree, and craft supplies, saves money. It also gives you the satisfaction of creating something unique with your own hands.
This tin can pumpkin craft is a quick project perfect for a cozy afternoon and a fun, screen-free family fall activity. Pair it with other inexpensive fall decor ideas, like using dried leaves or pinecones, to keep your fall decor affordable and eco-friendly.
How to Make a Tin Can Pumpkin Craft
Want the printable, step-by-step instructions? You will find them right down at the bottom of this post! Print them out and use them often! ⬇️⬇️
Creating your own tin can pumpkin craft is simple. You really don't need a lot of supplies. This simple step-by-step guide will show you how to make an adorable pumpkin decoration in no time. It's an excellent activity for kids and adults, so feel free to involve the whole family.
Supplies Needed

To get started on your tin can pumpkin craft, gather the following materials:
- 1 tin can, empty and clean
- Orange craft paint
- Paintbrush
- Wooden stem
- Two faux leaves
- Hot glue gun and hot glue sticks
- Paper plate (to protect your work surface)
How to Make Upcycled Tin Can Pumpkin Craft


Once you have your supplies ready, follow these steps to create your upcycled tin can Pumpkin:
- Prepare the can. Turn the empty tin can over and place it on a paper plate to avoid making a mess. Make sure the can is clean and dry before starting.
- Paint the can. Use your paintbrush to coat the outside of the tin can with orange craft paint. Set it aside to dry completely. You don't need to paint the inside of the can unless you prefer a finished look.
- Add additional coats. Once the first coat of paint is dry, apply a second coat to cover any spots and give the Pumpkin a more vibrant color. If needed, apply additional coats until you're satisfied with the coverage. Allow the paint to dry between each coat.
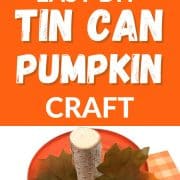
- Attach the stem and leaves. When the paint is completely dry, use your hot glue gun to attach the wooden stem to the top of the Pumpkin (the bottom of the can). Then, glue the two faux leaves near the stem for a finishing touch.
- Display your Pumpkin. Your tin can Pumpkin is now ready to be displayed. Place it on a mantel, a dining table, or in any spot where you want to add a little fall charm.
This simple craft project is an affordable way to create festive decor without spending much money. If you enjoy the process, you can make a whole set of tin can pumpkins in different sizes to create a fun display.
Tin Can Pumpkin Craft FAQs
Got questions about how to make a pumpkin craft for fall using a tin can? Go ahead and leave your questions below in the comments, and I'll do my best to answer them.
Can I use a different type of paint for this project?
Yes, you can use any paint that works on metal surfaces. Acrylic craft paint is a great choice.
Choose spray paint if you're looking for a smooth finish. Just be sure to allow enough drying time between coats.
What other frugal fall decor can I make?
There are plenty of ways to create budget-friendly fall decor. Besides the tin can Pumpkin, you can collect pinecones, acorns, or dried leaves to make garlands or centerpieces. Consider crafting a wreath using items from your yard, or repurpose old jars to create candle holders with a fall theme.
Can I make this craft with kids?
Yes, this tin can pumpkin craft is simple enough for children to make. Just be sure to supervise them, especially when using the hot glue gun. Painting and assembling the pumpkins is a fun, hands-on activity kids of all ages will enjoy.
Frugal Fun Pumpkin Craft From a Tin Can
This upcycled tin can pumpkin craft is a quick, affordable, and sustainable way to add fall decor to your home. By reusing everyday materials, you can create something unique that celebrates the season while keeping costs low. Try making one (or several!) for your home, and pair them with other frugal fall decor ideas to bring autumn's charm into every room.
Like this post? Save it, share it, and read it!


How to Make a DIY Tin Can Pumpkin Craft
Create this easy, frugal tin can pumpkin craft with simple supplies. A perfect upcycled fall decor idea for your home.
Materials
- 1 tin can, empty and clean
- Orange craft paint
- Paint brush
- Wooden stem
- Two faux leaves
- Hot glue gun and hot glue sticks
- Paper plate
Tools
- Paint Brush
- Hot Glue Gun
- Glue Sticks
Instructions
Turn the empty tin can over and place on a paper plate.
Paint the tin can orange. Set aside to dry. You do not need to paint the inside of the can.
Paint another coat on the tin can. Set aside to dry. *Paint more coats as needed.
Use hot glue to attach the pumpkin stem and leaves to the top of the pumpkin.
Display your pumpkin this fall season!