Are you looking for ways to reduce your waste and save money too? If so, consider making your own beeswax wraps. This is a simple home craft for anyone who likes the idea of a simpler, more sustainable, and greener household.
Why Use Beeswax Wraps

Estimated reading time: 9 minutes
When we first moved to our off-the-grid homestead ten years ago, it soon became pretty apparent that we were going to have to cut our garbage production drastically.
After all, the dump was a forty-minute drive away. Plus, they charge for each truckload of trash.
I had already started reading about becoming a zero-waste household, and we took baby steps toward this goal.
We started composting. And making our DIY pine vinegar cleaner stored in a refillable glass spray bottle.
To reduce the cost of our cleaning supplies, I also experimented with making homemade toilet bomb cleaners. Just recently we tried our hands at beeswax furniture polish with olive oil and lemon oil.
And then, I decided that learning how to make reusable beeswax wraps at home makes sense for a few different reasons.
Beeswax Wraps Save Money
First, you'll save money with these homemade reusable wraps.
When your kitchen supplies include beeswax wraps in several sizes and shapes, you'll use less of the following:
- plastic wrap
- cling film
- saran wrap
- sandwich bags
- aluminum foil or tin foil
- plastic containers
Plus, there is just something about beeswax food wraps that add a touch of rustic charm to a homestead kitchen.
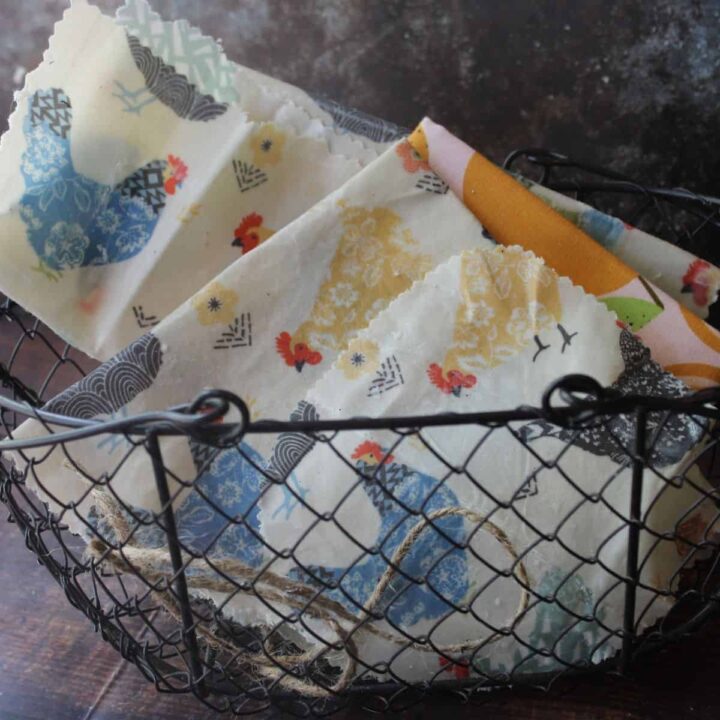
So I found this cute chicken fat square in a bundle of old wraps and material at a local second-hand store.
I often find the best price on craft supplies at thrift stores and garage sales.
It was just one small piece, but I made a large bowl cover, a sandwich wrap and two small round wraps from the fabric.
I use them instead of plastic food wraps or sandwich wraps.
I just place the wrap over the top of the glass jar or bowl. If needed, I can always secure it with a rubber band for a tight seal.
Reduce Your Waste

You'll produce less waste when using homemade food wrappers because you won't need as many plastic disposable food wrappers.
And there are many ways to use beeswax wraps. You can cover bowls, sandwiches, leftover food and more. You'll produce less household waste to cart to the curb or the dump.
Each time you use a reusable beeswax food wrap, you reduce your dependency on single-use plastics.
They help to cover onion halves, cheese, and other small fridge items.
You can use any smaller pieces of fabric you have on hand, but make sure it is 100% cotton. That way, it will absorb the beeswax mixture well. At the same time, it's also breathable.
How You Use Plastic
Before starting this step-by-step tutorial, consider how much plastic your family uses.
How do you use plastic containers and wraps? Do you cover fresh food? Store leftovers?
And before cutting your cotton cloth, think about the size and shapes of the items you'll cover with your DIY beeswax wraps.
Will you mostly use large wraps, or will a small wrap do the trick? The best part about making beeswax wraps is that you can make them in different sizes and use them in different ways to suit your needs.
For example, we use them for food storage, often covering different-sized bowls or glass containers. We also use them for wrapping sandwiches, tomato or onion halves, cheese, and fresh herbs.
One of my good friends always takes a stack of medium wrap with beeswax to the grocery store as a plastic-free alternative for her fruit and veggie purchases.
How to Use Reusable Wraps

You can use these reusable wraps to store any food items you would typically cover with plastic cling wrap or toss in plastic bags.
Other Uses:
- wrap the end of a cucumber
- to wrap up school lunches
- to store a block of cheese
- for carrying and storing items you buy at a farmer's market
- as a snack packet - you can "bend" the wraps into shapes to store nuts and dried fruit or even cookies.
....and did I mention they make great gifts? Especially for older kids (tweens and teens) to make and give.
What Size Beeswax Wrap
Here are some basic measurements of wax fabric wraps for everyday household use.
Sizes for
- Sandwiches- 8"x 6 ½"
- Small produce halves-6"-8"
- Larger Produce-12"x12"
- Artisanal Bread Loaves- 18"x24"
- Bowls-depends on your most commonly used bowls
How to Make Beeswax Wraps
It's pretty easy to make beeswax wraps, making a great homeschool activity. It's probably best for middle or high school students working independently because you'll need to heat the beeswax.
Younger children could also make beeswax food wraps with adult supervision.
Supplies Needed
Here's a list of what you'll need.
I try to stick to organic ingredients as much as possible.
And by the way, I just used leftover cosmetic beeswax pellets. We had some on hand after making our Orange Cider Beeswax Lip Balms last fall.
You will need the following:
- Cotton fabric (try organic cotton squares or at least natural materials)
- Pinking shears
- ½ cup beeswax pellets
- beeswax pellets
- 1 tablespoon olive oil
- 1" paintbrush
- Parchment paper
- Baking sheet
Directions for Making DIY Beeswax Wraps
Wash and dry the fabric. Avoid using fabric softeners of any kind, as it will reduce the fabric's absorbency.
Cut fabric to the desired size.
If you make a larger wrap for a large bowl, grab your most used bowls and trace around the bowl using a white crayon.

Cut around the circle, but allow an extra 2" all the way around for wrapping; use pinking shears (zigzag scissors) to stop the fabric from fraying.
Spread wax paper or parchment paper out on a baking sheet and lay your cut cotton pieces on top.

Place beeswax pellets and oil in a microwave-safe bowl or cup and heat for 1 minute. Stir well.

If your mixture is not completely melted, heat in 30-second increments until it is liquid.
You could also melt this in a double boiler on the stove.

Quickly "paint" the beeswax mixture all over the fabric, and be sure to saturate the fabric from edge to edge.
Hang waxed pieces outside to dry on a line.

To "activate" my beeswax wraps, I will crinkle them up just a bit in my hands.
The heat of your hand will help soften it, so it sticks a little better to cover the bowl or food item. You can also use rubber bands or twine to hold your wraps in place.
How to wash beeswax wraps
Rinse with a gentle soap in cool water only; hot water will melt the beeswax and ruin your wraps.
I let them sit for a few seconds in a sink of soapy water.
Then after rinsing them in cold water, let your reusable food wraps dry on the dish rack. Or you can hang them outdoors to line dry.
Storing your beeswax wraps

After washing, allow your wraps to dry fully.
Then fold your clean beeswax wraps carefully and place them in a drawer or a pretty basket on the counter, ready for the next use.
These wraps do just fine for most of the year at room temperature. With proper care and storing them in a dry place, they should last at least five to six months.
Note: I try to keep them out of direct sunlight in the summer because the beeswax will melt a little if it gets hot enough.
Not crafty? No worries. Store-bought beeswax wraps work too! Look for bee's wraps at one of online stores like Lehman's (affiliate link) or Amazon.
FAQs About Ways to Use Beeswax Wraps
Can I cover raw meat with a beeswax wrap?
I haven't. We rarely have raw meat for any length of time without freezing it or eating it, so it hasn't been an issue.
However, I was recently considering buying waxed butcher paper in bulk online for storing meat in the freezer.
Honestly, I'm wary of having raw meat come in contact with the beeswax wrap because it would be tricky to clean the bacteria without boiling water, which would melt the wax.
Can I cover hot food with a beeswax wrap?
I don't because I don't want the heat from the food to melt the beeswax into the food.
How to Make Beeswax Wraps
Learn how to make and use beeswax wraps to lower your food storage costs and produce less waste in your household!
Materials
- Cotton fabric (try organic cotton squares or at least natural materials)
- ½ cup beeswax pellets
- beeswax pellets
- 1 tablespoon olive oil
- Parchment paper
Tools
- Pinking sheers
- 1-inch paintbrush
- baking sheet
- measuring cup
- measuring spoons
- twine or
- clothesline
- clothespins
Instructions
- Select 100% cotton material.
- Wash and dry the fabric. Avoid using fabric softeners of any kind, as it will reduce the fabric's absorbency.
- Cut fabric to the desired size. If you want to make a more oversized wrap for a large bowl, grab your most used bowls and trace around the bowl using a white crayon.
- Cut around the circle but allow an extra 2” all the way around for wrapping; use pinking shears (zigzag scissors) to stop the fabric from fraying.
- Spread wax paper or parchment paper out on a baking sheet and lay your cut cotton pieces on top.
- Place beeswax pellets and oil in a microwave-safe bowl or cup and heat for 1 minute. Stir well.
- If your mixture is not completely melted, heat in 30-second increments until it is liquid. (And yes, you could also melt this in a double boiler on the stove.
- Quickly “paint” the beeswax mixture all over the fabric, and be sure to saturate the fabric from edge to edge.
- Hang waxed pieces outside to dry on a line.
Notes
To “activate” my beeswax wraps, I will crinkle them up just a bit in my hands.
The heat of your hand will help soften it, so it sticks a little better to cover the bowl or food item. You can also use rubber bands or twine to hold your wraps in place.
Recommended Products
As an Amazon Associate and member of other affiliate programs, I earn from qualifying purchases.


Like this post? Save it, share it, and read it!