
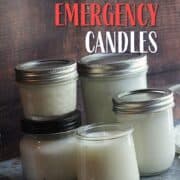
DIY emergency candles are a great resource to have on hand for power outages and extended blackouts. They can be an essential part of your emergency preparedness kit. Learn how to make these simple survival candles at home.

Estimated reading time: 9 minutes
Why make your own candles

If you've been following our site for any time, you know that we live off the grid. And we also like to be prepared. We're constantly looking for ways to improve and add to our emergency supplies.
It's handy to have a supply of these DIY emergency candles for a natural disaster, power outage or other survival situation.
And sure, there are many survival candle options out there. Just take a look at your favorite outdoor outfitter. And yes, I have bought survival candles. As well as decorative candles and votive candles.
So why do we make our own candles? Because I want to know how. And I want my kids to know how too. Just in case.
Learn a New Self-Reliance Skill

I can depend on my store-bought and homemade survival candles for emergency lighting in an emergency, even just a short-term one, such as if our generator isn't running.
But if there's a long-term situation where store-bought items aren't available, at least I will have the know-how to make my own.
And yes, we did use "store-bought" supplies for this project.
Over the years, my children and I have experimented with many ways of making candles. In fact, candle making is a good DIY project for those cold winters and stormy weather homeschool days. (We've also experimented with soapmaking, sewing, quilting, and making beeswax wraps.)
We've tried taper candles, beeswax wrap candles, and various mason jar candles. Have you heard of an emergency crayon candle?
As a science project, we tested the wax crayon method to make small candles. It was fun, but I wouldn't want to depend on them in an emergency.
We haven't tried making homemade emergency candles from animal fat yet, but it's on our homeschool survival skills list.
You can make your own candles in as little as 30 minutes with just a few steps.
How to make DIY candles at home
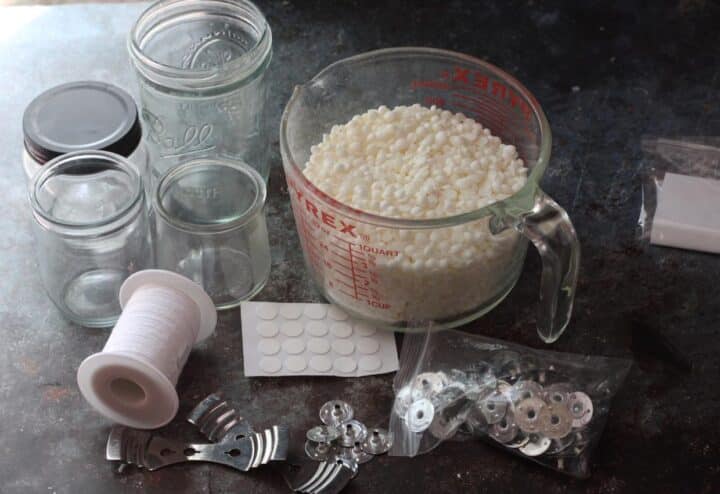
You can purchase a case of half-pint mason jars for uniformity, or you can do as I did and use up all those little irregular jars that aren't big enough for canning.
This is great for random jars that once contained bouillon, minced garlic, old candle jars, small mason jars, salsa jars, etc. I like to use smaller squat jars for this purpose.
Five pounds of wax should fill about 12 -13 small jars, roughly half-pint-sized.
What You'll Need
Here's what you'll need to make these easy DIY emergency candles.
- Glass jars
- Soy Wax flakes or pellets OR beeswax pellets
- Large glass measuring cup
- Candle Wick Roll (This can be a cotton wick - don't use a paper wick because they let the candle burn too fast.)
- Metal sustainer tabs
- Hot glue or double-sided sticky dots
Either buy these online or check your local craft stores for your supplies.
This type of homemade candle is a great emergency candle.
Instructions for DIY Emergency Candles

Since I use various glass jars in different sizes, I find it easiest to measure my soy flakes into the jars first, then melt them into liquid wax.
So, to begin, pour soy wax into all your jars, leaving about ½" space on top.


Then, pour the still-dry soy flakes or pellets from the jars into your large glass measuring cup to make these in the microwave. Or, if you prefer, you can also melt them in a double boiler or a large pot. I keep a measuring cup designated for my wax.
Doing this makes sure you melt the correct amount of wax for this batch of candles.
Set aside and prepare your jars.
Next, it is time to prepare the jars with wicks. Measure the jar and cut the candle wicks to be 2" longer than the glass jar.
Slide wick through the metal sustainer tab and secure with double-sided sticky dots, or use a dab of hot glue.
Press into the center of the bottom of the jar.
Place your jars somewhere undisturbed until the wax hardens completely. You want to avoid moving the hot wax or sloshing it around in the jar until it sets
If you use a candle-making kit with wick holders, use those to hold your wax straight up in the jar. I only had a couple of these, and in some cases, some of the mouths of my jars were too small for them.
In this case, use a wooden clothespin to hold up the wick. I've also heard of people using large paper clips to hold the wick in place when using smaller jars.
Heat soy wax pellets/flakes in the microwave for 1 minute, stir, and repeat these two steps in 30-second increments until the wax completely melts.
Carefully pour wax in from the side of the jar, filling to slightly less than ¼" from the top rim.
Let the wax harden completely.
Once cool, trim the wicks to ¼" and replace the lids on your jars.
DIY emergency candles FAQs

Here are some frequently asked questions about making your own emergency candles.
How long do these candles last?
These homemade candles have an approximate burn time of more than 40 hours. Plus, they burn clean and unscented to keep air quality pure. They are also very easy to make.
Can I add essential oils to my homemade soya candles?
Yes. I didn't add any in this batch, but I have in the past. Just add a few drops though, about 5-6 drops per pound of dry wax pellets to start.
How should I store my DIY emergency candles?
Store your mason jar emergency candles in a Rubbermaid tote, individual survival kits, or shelves in a cool place. And remember to pack plenty of matches or a flint firestarter with them so you're ready in an emergency.

How to Make DIY Emergency Candles
Discover how to make DIY emergency candles with simple household items. Perfect for power outages or camping trips! Step-by-step guide to help you be prepared and stay safe.
Materials
- Glass mason jars
- Soy Wax flakes or pelletsCandle Wick Roll
- Metal sustainer tabs
- Double-sided sticky dots (optional)
Tools
- Microwave OR
- Double boiler
- Scissors (optional, for cutting wicks)
- Wick holders OR
- Large clothespin for holding wicks
Instructions
- Pour soy wax into all your jars, leaving about ½” space on top.
- Pour wax from the jars into your measuring cup or melt them in a double boiler if you prefer. This lets you see just how many soy flakes or pellets you need to melt to make your candles.
- To prepare the jars with wicks, measure the jar and cut a wick that is 2” longer than the jar.
- Slide wick through the metal sustainer tab and secure with double-sided sticky dots, or use a dab of hot glue.
- Press into the center of the bottom of the jar.
- Heat soy wax pellets/flakes in the glass measuring cup in the microwave for 1 minute. Stir, and repeat these two steps in 30-second increments until the wax is completely melted.
- Carefully pour wax in from the side of each jar, making sure the wick stays in place. Fill each jar to slightly less than ¼” from the top rim.
- Place your jars somewhere that they can be undisturbed until the wax is completely hardened. You don't want to move hot wax around or slosh it around in the jar until it is set.
- Let the wax harden completely.
- Once cool, trim the wicks to ¼” and replace the lids on your jars.
- Store jars in a tote or on shelves in a cool place.
Notes
If your candle-making kit didn't include wick holders, use large clothespins set horizontally across the top of the jar to hold the wick in place when pouring in your melted wax.
Like this post? Save it for later!


Hi Lois - cool! Let me know how they turn out. I've just been experimenting with tallow recently myself and have several crafts/DIYs coming in 2025 that are tallow-based.
This mini farmer is going to use tallow as I can't stand the smell of soy wax
Hi Donela! You know, I haven't tried this (yet) with regular beeswax, but I think it would work. Give it a try and let me know how you make out.
I'm extremely sensitive to the smell of soy, so would regular beeswax be an option for these candles or is there a specific type of wax I should look for?
We've been having quite a few power outages recently, and they tend to be in the evening, this has made my kids quite scared, so I wanted to turn the experience around. I'd never tried making candles before, but they were so easy to make. The kids all made their own and now they are excited to get a power outage so that they can see theirs in action, I love it when you can turn a negative into a positive - thanks for the great tips!