
Just like any livestock, rabbits need a safe space that will protect them from predators and the elements. These rabbit homes are known as hutches, and they come in all shapes and sizes.
Before you start, decide how many rabbits you'll be raising. This will give you a better idea about what size and type of hutch will best suit your needs.
The basic rabbit hutch design outlined below will be enough to get you started. There's a good chance most of the supplies you need will already be laying around your property, just waiting to be used on a homestead project.
If you've just joined the rabbit raising world and need a DIY shelter to protect them, follow these tips on how to build your own rabbit hutch.
This is part three of our series on how to get started raising rabbits for meat. Read Part I - How to Raise Rabbits for Meat and Part II - Raising Rabbits for Meat - Processing and Butchering here.

Table of Contents
Rabbit Hutch Building Basics
Before you get started, make sure you know what materials will safely contain the rabbits. You could always start by looking through your leftover materials from other homestead projects.
Maybe you have material scraps from when you learned how to make a pallet fence. Before using anything for your hutch, make sure the material is safe.
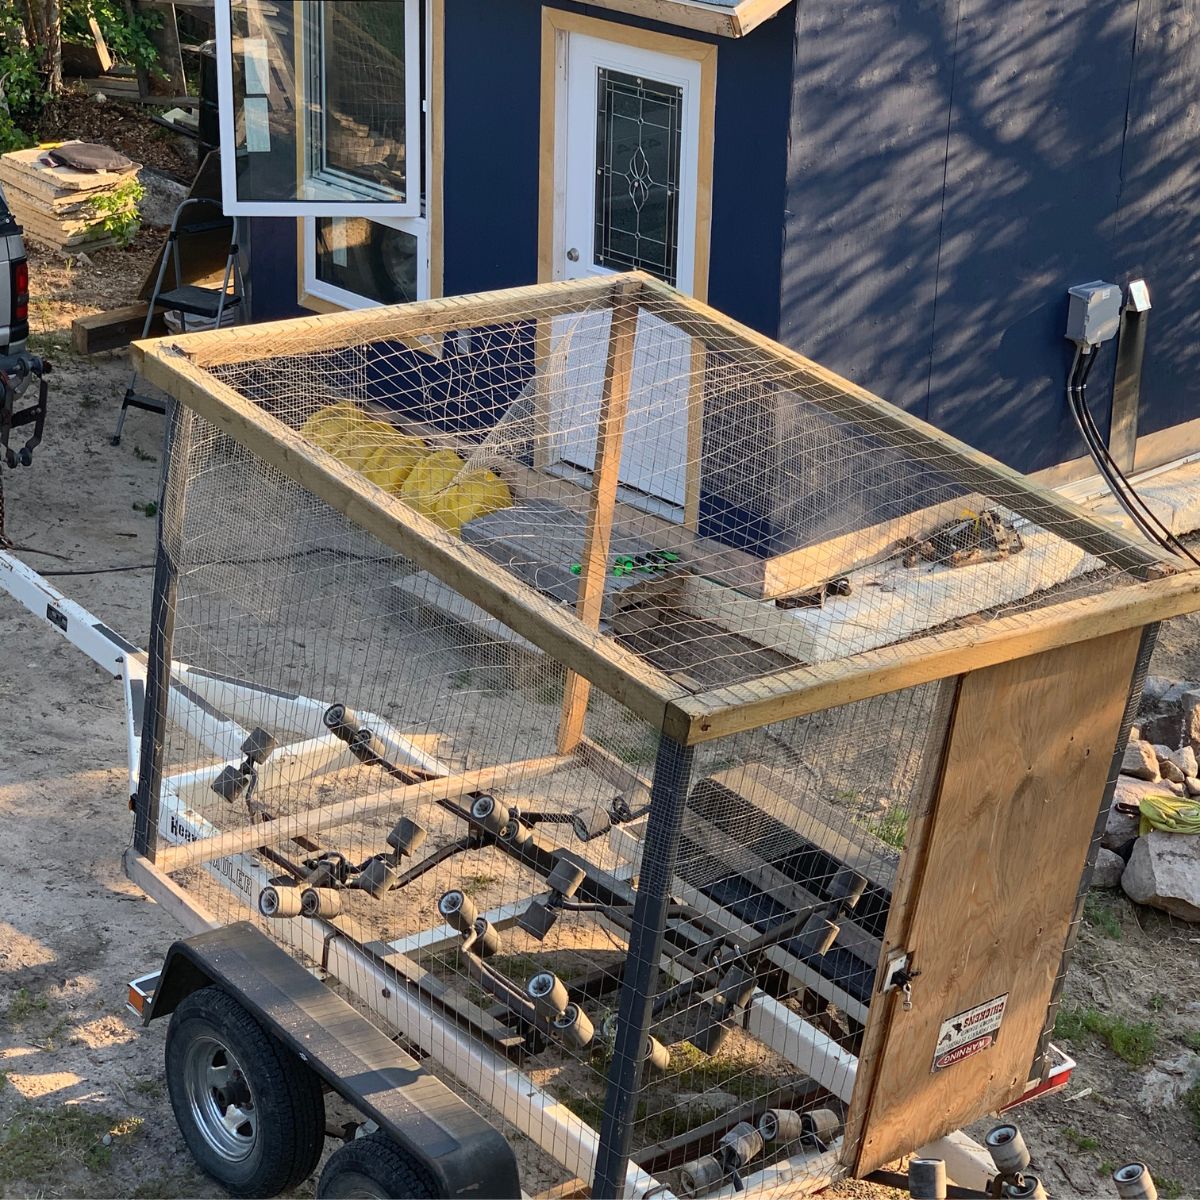
For example, if you have old chicken wire try NOT to use it for your rabbit hutch. Depending on the type of chicken wire, it can have larger gaps than others that will allow rabbits to get their feet caught, or in some cases, juveniles may squeeze fully through.
Instead, use proper rabbit wire that has small enough spacing to safely contain the animals without injuring themselves.
If you plan on using any pressure-treated wood for your hutch, be careful where you use it in the shelter. Rabbits love to nibble on things, especially wood.
Some rabbits may nibble on pressure-treated wood in their hutch and ingest the chemicals used to treat the wood. Do your best to only use pressure-treated wood on exterior parts that the rabbits don't have direct access to.
How Big Should a Rabbit Hutch Be?
For beginners starting with just a couple of rabbits, this simple hutch will be big enough for you to get started.
But keep in mind, if you plan on growing your rabbit colony one day, you may want to build a bigger box to start and add dividers for additional rabbits in the future. And you will likely want more in the future: rabbits are one of the best homestead meats to produce to secure your family's food supply.
To make sure you give your animals enough space, plan to give each rabbit an area roughly four times its physical size. This will give it enough room to freely move around inside the cage.
For average rabbits, this would equate to between 4 - 5 square feet of space per animal. For height, make sure the roof provides a minimum of 16 inches in clearance.
How to Build a Rabbit Hutch
Here are the really basic steps to get organized before starting to build your rabbit hutch.
- Choose your size
- Choose the location for your rabbit hutch
- Set your dimensions
- Choose your material (wood scraps, lumber, door, screen)
- Calculate how much material you will need
- Source your material (local lumber yard, local online classified, online through Amazon or Lehman's)
- Start building!
Getting Rabbit Hutch Plans
If you have some untreated 2x4 and 4x4 lumber, these will be ideal for the framing and supports. Use the 2x4 pieces for framing a square box to the dimensions you've settled on for your number of rabbits.
The 4x4 posts will provide ample support to your hutch and keep it raised off the ground and away from predators and other pests. Aim to have your hutch between 3 - 4 feet off the ground.
Once you've assembled the frame to your size specifications, cut flat wooden boards to fit the roof and floor of your hutch frame.
Try and reuse whatever scrap boards you have available, but remember the issue with rabbits and treated wood. Just like any DIY home project, use common sense when selecting what scraps to use on your hutch.
Some people prefer to use rabbit wire for the flooring in hutches. This gives urine and droppings a place to fall out of the cage, making it easier to keep clean.
Depending on your specific needs, you may use either method. Keep in mind to use the smallest gauge possible though, as baby rabbits' feet can slip through.
Rabbit Hutch Doors
With the floor and roof now attached, you need to decide how you'll access the rabbits inside the hutch, and how it'll be cleaned. This will help you figure out the best place to position a door.
Rabbit hutch doors don't need to be fancy, you just need a couple of small hinges, a latch, and some 2x2 scraps to build a small door frame.
Depending on your hutch situation, you may want your rabbits to have access to an outside area as well. If that's the case, you can get creative with your door placements and whether you want them to open vertically or horizontally.
Rabbit Wire
Now that you've decided where the door will be, you can start installing rabbit wire along the sides to close in the hutch. This will allow you to see in and keep an eye on the rabbits, as well as provide ventilation and airflow to them.
Fasten the wire to the frame using screws, nails, or staples. I always suggest using screws, as they're easier to work with and provide a sturdier finished product.
Where Should I Put a Rabbit Hutch?
Rabbits don't like too much direct sunlight, as they can overheat very easily due to their thick fur. Place your nearly finished hutch under a tree or near a shaded area of your yard that doesn't receive too much direct sunlight.
If you don't have a shady enough area, add some extra roofing cover or shaded areas inside the hutch where your rabbits can retreat to if they become overheated.
Once you've found a spot for your hutch, you need to give the 4x4 posts some support to sit on. If you have an extra bag or two of fast-setting concrete around your homestead, you should use it to set and anchor your posts properly into the ground.
If not, most hardware stores have precast fence post bases available for under $10. The upside of using these is that you will be able to move your hutch around more easily in the future if you need to.
Bedding, Food & Watering
Now that you have the skeleton of your hutch ready, you need to add some finishing touches to the inside. For bedding, add clean, dry straw or unbleached and shredded paper to the floor of the hutch.
The bedding will need to be changed regularly; nobody likes wet or soiled bedding, especially rabbits.
You will also need to add some form of feeding and watering system to the hutch. A wide range of options for feeders exists, including crocks, bamboo troughs, grass managers, and hoppers.
Popular watering solutions include earthenware crocks, enamel cups, or plastic containers. To learn more about which of these solutions will work best for your setup, check out the Peace Corps Handbook on Backyard Rabbit Production.
Depending on what supplies you already have, and what you have access to, will determine the final design of your rabbit hutch. Reuse and upcycle as much as you can from around your homestead, and get creative with your rabbit hutch design.
Also, as you grow your rabbit colony, ensure they each have enough space. Add new hutches as needed, or build a larger one to start and fill it in as your colony grows.
For further information on various types of rabbit hutches and how to build them, check out Grit's DIY solutions for rabbit hutches.


Do rabbits need precautions for extra warmth in the winter time, speaking for areas that drop into single digits (F) and below? Or do they naturally keep warm with their coat?
Thanks Blake, for sharing with us at Farm Fresh Tuesdays Blog Hop! Your post is one of my features at this week's hop. Be sure to stop by to see your feature and say hello!
Melissa | Little Frugal Homestead